746 words
on
Mac OS X 10.6 Snow Leopard
 In the past I have frequently complained about Time Machine’s unwillingness to offer encrypted backups. I consider that to be a significant shortcoming as you may want to store your backup drive away from home and may be uncomfortable if everybody able to get hold of that drive can also read all your data.
What’s particularly sad about this shortcoming of the software is that all the infrastructure required to make it work already exists in Mac OS X and Time Machine. There’s just no button to easily access it.
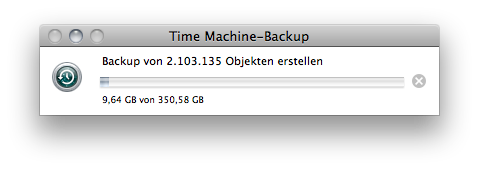
The details about how to set this up changed a little bit between Mac OS X.5 and X.6 and as Time Machine recently pleased itself by deciding that one of my backup disk images is broken with no explanation offered, nor an option to fix it again:

I eventually gave in and decided to start my backup anew – thereby sacrificing all the history Time Machine had built up over the past months.
I record the steps required for later reference, so I don’t have to google for them again in the future.
- Connect to a writable Apple File Sharing (AFP) volume.
- Go to Time Machine Preferences and set up Time Machine to back up to that volume.
- Start the backup. This will create a disk image called ‘Kalle.sparsebundle’, where ‘Kalle’ is the name of your Mac, on the remote drive which is set up correctly to serve as a Time Machine disk image.
- Cancel the backup once the disk image has been created.
-
Copy the .sparsebundle disk image to the top level of your backup drive.
-
Convert the disk image to an encrypted disk image using the command
hdiutil convert -format UDSB -o Backup.sparsebundle -encryption AES-256 Kalle.sparsebundle/ in the folder of the image. Again, ‘Kalle’ is the name of the original file, usually the name of your Mac. This will ask you for the password you want to use to secure the encrypted disk image and creates a new, encrypted, image called Backup.sparsebundle.
-
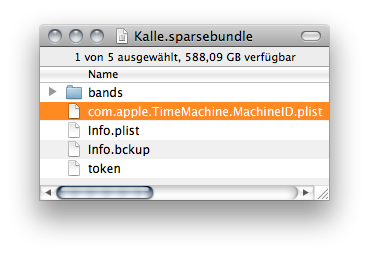
Both the original and the new disk images are bundles. Use the Show Package Contents command in the Finder on both of them to see their contents.
-
The original bundle contains a file called ‘com.apple.TimeMachine.MachineID.plist’.
 Move that file into the new ‘Backup.sparsebundle’.
-
Double click the new ‘Backup.sparsebundle’ disk image to mount it.
-
Enter the password needed to read the encrypted disk image check the checkbox for storing that password in the Keychain.
-
The disk image’s drive is now available in the Finder. Observe the free space it has. If the network volume the image was created on is small, the free space may be much less than you need. [You will probably want a size that’s around twice the data you want to back up or all of your backup disk.] In case you determine the available space to be too little, eject the disk image and use the command
hdiutil resize -size 1t Backup.sparsebundle/ in the Terminal to increase the disk image’s maximum capacity. Here, 1t means that I want the image to be able to grow to 1TB in size, you need to adjust that number to suit your needs. The converted disk image will be called ‘Backup.sparsebundle’. You could choose any other name here. You can also delete the original disk image ‘Kalle.sparsebundle’ once everything is set up and working.
-
Open the Keychain Access application.
-
The newest key in your Login keychain will most likely be the one used for the encrypted backup image with the name ‘Backup.sparseimage’ in our case. Select that key and move it to the System keychain, so the operating system itself will be able to use the disk image without you having to enter your password every time. You will need to enter an administrator password when doing that.
-
In the Time Machine preference pane, select your backup drive as your backup volume.
-
Start a backup.
If all has gone well, Time Machine will now be able to locate the disk image – thanks to the file you moved into it –, mount it – using the password you put into the System keychain – and start doing its back up duty.

If something went wrong on the way, Time Machine will either create its own ‘Backups.backupdb’ folder on the backup drive if it cannot find the disk image or it will fail to do anything if it cannot find the key required to read the encrypted image.

May 14, 2010, 8:43
Tagged as
encryption, os x, time machine, x.6.
At the rate that Apple’s “Time Capsule” fails, you’d think that they’d offer encrypted backups as a matter of course. But no. When your Time Capsule inevitably fails, you have to send it back full of all your personal information (which Apple assures you is deleted). Thank heavens for electromagnetic bulk tape erasers!
May 14, 2010, 13:27
I don’t have a Time Capsule myself and haven’t followed Time Capsule news either, so I wasn’t aware that they actually FAIL in hardware. I just thought they occasionally destroy your backups (haha).
Particularly if you work with confidential information – be it registration data for your software customers or NDAed software, many other work things or your address book – sending in your data sounds like something that is a huge breach of privacy and possibly illegal in some way.
Likewise if you have an ‘off-site’ backup, as I do in my office, where the hard drive is out of your direct control a lot, the encryption seems like a good thing.
The real shame is that – as far as I can tell – Apple has all the relevant pieces of technology in place. And they had from the day that X.5 was released. So it’s unclear whether they’re just too stingy to put on the finishing touches on that feature to turn it into a single easy-to-use checkbox, whether there may be some underlying technical issues that may come and bite you (I have asked around a bit, and everybody I spoke to who uses the encrypted disk image method seems to be happy with it) or whether it’s just one of those gratuitous Apple things where Mr Jobs is ‘happy with Time Machine as it is today’.
I assume the latter is the case. But having their word on it would feel more comfortable.
May 14, 2010, 15:03
I use PGP to encrypt an external drive but have not tried it on a Time Capsule.
May 14, 2010, 17:26
Man this is great !! Thanks for taking the time to write this. I have been using PGP WDE (Whole Disk Encryption) on my uMBP (17” early 2009 10.6.4) to secure my laptop data, and to also encrypt my external clone drive, but I couldn’t find a way to encrypt my T.C. drive. Now I have all 3 copies secure thanks to you :-)
My question is, how can I test that the new encrypted sparsebundle is in fact actually encrypted… ? Its late here now, so perhaps its just me, but I have this new encrypted sparsebundle in finder, and if I do NOT mount it, yet right click, and view contents, how come it shows me the contents if it is encrypted until mounted… ?
Thanks again, and keen for your reply… :-)
MOKA
June 21, 2010, 13:28
@MOKA:
That’s hard to tell. The fact that you can see the files inside the sparsebundle is just a technical details and not an issue affecting the encryption. It’s the content of those files that’s supposed to be encrypted.
Now there could be two ways of this going wrong. One of them being that Apple are too incompetent to implement the encryption correctly. And the other one being that Apple are malicious and left open backdoors in their disk image encryption. I haven’t heard about that being the case - but I doubt those things would be easy to spot.
If your data are too sensitive to trust them to Apple’s competence and honesty, I strongly recommend using a different tool than Apple’s software.
June 23, 2010, 16:32
It works great. Thanks!
September 21, 2010, 12:55
A most excellent write-up on a method for encrypting a Time Machine Backup.
Thank you so much for sharing that, Sven.
I have been using MacFuse and TrueCrypt, but with mixed results.
The idea is that with MF installed you can cause TM to be able to see a TC volume.
The trick is… after setting up the TC volume, you open it, and then you use Apple’s disk util to reformat the opened volume. It will then be ‘living’ inside a TC encrypted container.
After mounting your TC container TM should be able to see the volume contained in it and use it for backup.
I think the thing to look out for is different manufacturer’s drives may not work so well with this solution.
Having laid out the basic idea of it, you should be able to find more specific information on how to do this around the net ;^)
Cheers, TwoHawks
February 5, 2011, 19:33
Thanks so much for writing this up in such a clear fashion.
One thing you might want to mention: if “hdiutil resize” gives you a “can’t allocate memory” error, here are directions on how to do the resize stepwise: http://boardreader.com/thread/hdiutil_returns_error_trying_to_resize_s_5p2wzX1hps7.html.
July 4, 2011, 8:37
Hi
I just used your info to build me encrypted backups to my FreeBSD router with
netatalk 2.2.0p6.
Thank you very much.
Denis
July 27, 2011, 13:13
Works fine for 10.6.8
Thanks!
September 6, 2011, 23:05
Brilliant. Brilliant! Thank you.
December 23, 2011, 0:47
Why step 5? Isn’t the sparsebundle already at the top level of the volume?
June 20, 2015, 19:41
@lg:
If the network volume you connected to is your desired backup volume, it is. Otherwise you will have to copy the disk image to the drive you want your backup on.
June 22, 2015, 21:56
![]() In the past I have frequently complained about Time Machine’s unwillingness to offer encrypted backups. I consider that to be a significant shortcoming as you may want to store your backup drive away from home and may be uncomfortable if everybody able to get hold of that drive can also read all your data.
In the past I have frequently complained about Time Machine’s unwillingness to offer encrypted backups. I consider that to be a significant shortcoming as you may want to store your backup drive away from home and may be uncomfortable if everybody able to get hold of that drive can also read all your data.
 Move that file into the new ‘Backup.sparsebundle’.


