New hard drive vs Time Machine
982 words on Mac OS X 10.6 Snow Leopard
I exchanged the hard drive in my (2008 white) MacBook. On the hardware side, that is a very quick thing to do. The MacBook is well designed for these kinds of exchanges: A coin removes the battery, three Philips screws need to be unscrewed to remove the cover of the RAM and hard drive, with the nice touch that the screws are actually part of the cover and cannot fall out and get lost. Which means that 20 seconds after starting you have removed the hard drive which is pulled out using a little plastic tab.
Next comes the hardest step: Removing the hard drive from the tray holding it inside the MacBook. You can see Apple’s only poor design decision here as they – once more – chose Torx (T8) screws for that. Meaning that you will be cursing at this step if you don’t have the matching screwdriver. In fact, the screws on my hard drive sled are already quite blank and shiny as I loosened and fixed them a number of times using pliers already (doable but rather annoying). As my brother gave me a nice T8 screwdriver last christmas, I could actually enjoy this step this time around and finished it in a few seconds. Reversing all the steps leaves you with a new hard drive in your MacBook.
The really time consuming part of the hard drive exchange is the software side, though. Copying hundreds of gigabytes of data takes a long time and will use a whole day or night. As I didn’t want to waste even more time by doing a fresh install and going through the lengthy migration progress and the software reinstallation it necessitates, I cloned the old drive to the new one and took it from there. Everything worked fine, just Time Machine insisted on re-adding the complete drive to my backup – which would have exceeded the backup drive’s capacity. Luckily I messed around with Time Machine before and the resulting knowledge along with some googling and adapting techniques for Mac OS X.6 let me fix the issue.
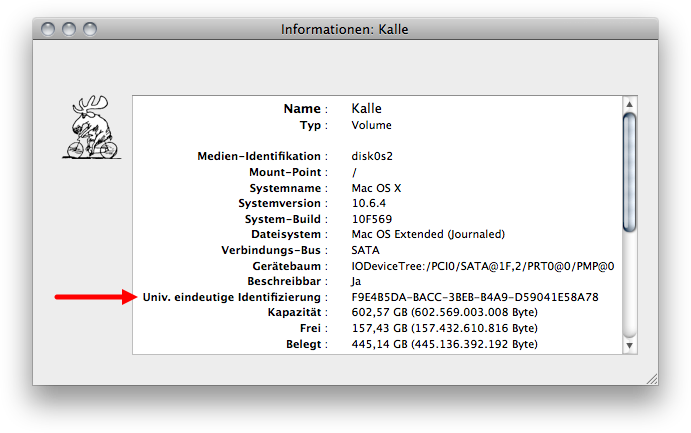
I think it’s fair to say that this is an ‘issue’ rather than a problem as it is caused by Time Machine internally identifying volumes by their unique identifier, rather than by their name which is the right thing to do. It just comes to bite you when you clone a drive. The new volume has a new identifier, hence Time Machine fails to recognise it as the same volume as the one you had before. You can see the volume’s identifier by selecting it in Disk Utility and using the Get Info command:
Terminal lovers can also use the diskutil command to achieve the same, e.g. for the startup volume (or any other volume by using its path instead of /:
ssp% diskutil info / | grep UUID
   Volume UUID:              F9E4B5DA-BACC-3BEB-B4A9-D59041E58A78
Now that we know the identifier of the new startup volume, the next step is to let Time Machine know about it. Time Machine’s usual way of storing technical information is using extended attributes. That is also the case for the identifier which is stored in the com.apple.backupd.SnapshotVolumeUUID extended attribute of each volume’s folder inside the backup’s folder hierarchy. It can be read using the xattr command. I am assuming that your backup volume is mounted at /Volumes/Backup, that the machine you are backing up is called ‘Machine’ and the volume you want to change is named ‘Volume’ in what follows. You need to adapt that to the paths on your machine when using the command there.
ssp% xattr -p -l com.apple.backupd.SnapshotVolumeUUID /Volumes/Backup/Backups.backupdb/Machine/Latest/Volume/
com.apple.backupd.SnapshotVolumeUUID:
00000000  34 30 44 37 43 46 37 32 2D 42 33 39 35 2D 33 46  |40D7CF72-B395-3F|
00000010  43 42 2D 38 34 32 31 2D 35 46 45 42 45 44 43 34  |CB-8421-5FEBEDC4|
00000020  34 39 35 36 00                                   |4956.|
00000025
As Time Machine protects its backup volumes rather well from the user messing with therm and there seems to be no way to turn that off in the graphical interface, the next step is to remove ‘access permissions’ from the backup volume (which in my case is on a disk image as I prefer my backups encrypted). This can be done using the diskutil command with administrator rights:
sudo diskutil disableOwnership /Volumes/Backup
It seems like a good idea to not mess with the volume in any unnecessary way in this situation and just do what we came for: set the extended attribute to the identifier of the new volume.
sudo xattr -w com.apple.backupd.SnapshotVolumeUUID F9E4B5DA-BACC-3BEB-B4A9-D59041E58A78 /Volumes/Backup/Backups.backupdb/Machine/Latest/Volume/
If you observe things closely, you’ll see that the original extended attribute ended in a trailing NULL-character like a C-string does, while the newly set extended attribute does not. This difference doesn’t seem to matter for anything but the display by the xattr command. As it’s a bit tricky to actually get the NULL-character into the extended attribute, I just stuck with the easy way.
Finally ‘lock’ the volume again by re-enabling access permissions:
sudo diskutil enableOwnership /Volumes/Backup
Actually it seems that Time Machine will automatically restore access permissions for you the next time it is running if you forget this step. Still, doing it seems like a good idea.
And that is it. Backups from the cloned new hard drive in my MacBook seamlessly continued the previous series of backups just like I wanted it to. The only difference is in the extended attributes (both their value and, for technical reasons, their format) – before and after:
ssp% xattr -p -l com.apple.backupd.SnapshotVolumeUUID /Volumes/Backup/Backups.backupdb/Machine/2010-07-14-094357/Volume/ /Volumes/Backup/Backups.backupdb/Machine/2010-07-14-104415/Volume/
/Volumes/Backup/Backups.backupdb/Machine/2010-07-14-094357/Volume/: com.apple.backupd.SnapshotVolumeUUID:
00000000  34 30 44 37 43 46 37 32 2D 42 33 39 35 2D 33 46  |40D7CF72-B395-3F|
00000010  43 42 2D 38 34 32 31 2D 35 46 45 42 45 44 43 34  |CB-8421-5FEBEDC4|
00000020  34 39 35 36 00                                   |4956.|
00000025
/Volumes/Backup/Backups.backupdb/Machine/2010-07-14-104415/Volume/: com.apple.backupd.SnapshotVolumeUUID: F9E4B5DA-BACC-3BEB-B4A9-D59041E58A78


